

Thursday, July 2, 2009
AKu!!
I've been busy, so I haven't had much time to work on much. I did this as a speed modeling practice. I still want to do more with him, but this is all I have for now.
Saturday, June 27, 2009
Earring/Eyelashes
I threw on some eyelashes. I also made an earring that I like much more then the last. 

Back to working on the face.
I started adding more details to the face. The color texture is mostly there for placement.


Tuesday, June 23, 2009
Torso color map reworked
I have been working on the texture maps. I think I have found the basic color configuration that I want to go for. I really like the red corset and brass/brown colors. The UVs for the gear haven't been laid out yet. I just colored them for placement.
The wires:
 Rough renders:

The wires:
 Rough renders:
Beginning pass at color/displacement maps
This is just a test render of the color map with the displacement map. I started sculpting the wrinkles in Mudbox. They need a lot of work and I'm still new to digital sculpting. I like the power of Mudbox, but I haven't fully figured out how to achieve certain aspects in it.
I plan on changing the colors around. This is primarily a test render.
 The Low Poly and Smoothed versions of the wire frame.
I plan on changing the colors around. This is primarily a test render.
 The Low Poly and Smoothed versions of the wire frame.
Monday, June 22, 2009
Female Steampunk character UVs.
I spent a lot of time unwrapping the UVs of this model. I'm pretty excited to start texturing and sculpting the displacement map now that the grunt wok is done. 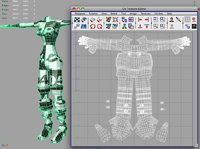

Saturday, June 20, 2009
New face sculpt, skin shader, and cloth shader renders.
I started working on the sculpt of the head. I want to work on it a lot more but this is what I have so far. I really like the nose. I need to shape the jawbone and cheekbones more. I also want to add more geometry to the bead to make it bushier. I also added a basic skin shader to the face. I still need to add a lot more layers to the shader but it's a start.
 The full scene without the obnoxious green glow:
 A basic cloth texture added to the cloak. I really like how it fades into darkness. My ultimate goal with this render is to make him look like he's emerging from the darkness behind him.
  And a pass with the green lighting, in order to see the effect it has on the cloth and skin. I want to rework the effect entirely. It's acting as a placeholder right now.
Thursday, June 18, 2009
More renders
I added a cloak and took out the bump map. Did a little bit of light tweaking (not much).


And the ortho wires:


And the ortho wires:


First pass at rendering Mr. Gone
This is a verrrrrry rough draft of my render. However, I've had a few break throughs since my last update. After several hours of trial and error, and reworking several things over and over, I finally figured out the work flow for Mudbox to Maya. Having this experience under my belt will really improve my modeling and rendering capabilities. I am very pleased with the power of mudbox, I just need a little bit more practice before I can get my renders looking great. I've never been to keen on the render process. I've always ben more interested in the base structures and animation process. With this image, I textured the cloak with my mudbox displacement map. I haven't addressed the face or hands yet. This was just a bast layout of what I want my image to look like. The green orb is just there for placement and I plan on working out a more sophisticated glow effect for it. 

Tuesday, June 16, 2009
Staying busy...
I've been busy playing with Mudbox. Granted this model isn't amazing, but I really like how it's looking so far. I probably will have a grand time trying to get it back into Maya tomorrow. However, I've really enjoyed fleshing out the details in Mudbox. I can't wait to see this model with textures and fully rendered.


Learning Mudbox:
Well it was far past time for me to start expanding my skill sets. So, I decided to learn Autodesk: Mudbox. I would have to say I really like this application. I haven't fully figured out the work flow. I have mastered Importing Maya meshes into Mudbox. I can also easily bring the object meshes back into Maya. However, I'm still having trouble bringing the displacement map back into Maya. Once I figure this work flow out, I can see how this tool is very very very useful. There's a lot of power behind it. For humor's sake, here's my first go at my Mr. Gone character in Mudbox.

Given, it isn't remarkable, but it's my first pass at it. I can defintly see the potential. I really appreciate the control you have in the app and how smooth it feels. I have lots to lear but it's been a lot of fun figuring it out! I can't wait to get my Wacom tablet hooked up to this app and get some real work done.
I also spent a little time unwrapping the UVs on Mr. Gone's head model. It's not completely finished, but I knocked out a decent amount. I hate UVing with a passion, so I'm going to take my time to full unwrap the model.
 I've been fairly busy learning new stuff today, modeling, Uving, and sculpting in Mudbox. I think I'll take some time off... Maybe just a little time off.
Progress on Mr. Gone model..
I worked out the torso and began working on the arms today. So far I'm fairly pleased with my progress. It's nice to not have to focus so much on anatomy. There's still a lot for me to do with this though.. I want to start working in mudbox and this will be a great beginning tool for learning.


Sunday, June 14, 2009
New WIP: Mr Gone
I decided to take a break from my current character model.

One of my all time favorite comic book villains is Mr. Gone from Sam Kieth's series the Maxx. I really like his mysterious and downright creepy nature. Here is the very beginning.


One of my all time favorite comic book villains is Mr. Gone from Sam Kieth's series the Maxx. I really like his mysterious and downright creepy nature. Here is the very beginning.

Friday, June 12, 2009
the corset is looking great!
I am very pleased with how the corset came out. It's going to be a nightmare to rig and I'm not entirely sure how I'm going to do it. I spent some time on the hair.. I'm still not pleased with it, so I may end up re-designing it and reworking it. I also reworked the straps around the chest as separate objects so that they would look more like the belt and arm/leg straps. I'm excited about how well she is finally coming together..


Thursday, June 11, 2009
Drastic changes to belt...
I decided to rework some of the accessories. I was very unhappy with how the belt was turning out, so I totally reworked it. It's looking soooooooooooo much better now. I plan on reworking a few other things before I take the model any further. 


Wednesday, June 10, 2009
Added more edges and details to clothes.
I spent some time working on the clothes. I added more depth to them. I added a split in the front of the shirt. I made the loops around the chest and boots have more depth. I added some edges to refine some detail. Sculpted the knee more. More updates to come.


Tuesday, June 9, 2009
Started the belt...
I decided to make the belt a separate object due to the nature of its design in comparison to the clothes around it. Not sure if I'm going to add the valves or some sort of other details around the belt yet. They just don't seem to translate to 3d too well..


I posted some screen shots to CG Society looking for feedback. The thread is here:
http://forums.cgsociety.org/showthread.php?p=5914815#post5914815


I posted some screen shots to CG Society looking for feedback. The thread is here:
http://forums.cgsociety.org/showthread.php?p=5914815#post5914815
Wednesday, June 3, 2009
More fun with hair & accessories... joy!
After an exhausting day of babysitting the neighbors kid, I got to spend some time working on the hair. I added the loop hair accessories. I added a bit more detail to the goggles. The hair is still far from finished. I still need to adjust several clumps to make them a little less uniform. I also need to add the bangs and more hair clumps on top. Lots more for me to work on! Gotta love how things start to get messy at this stage... I can't wait to start unwrapping UVs...gulp!


Tuesday, June 2, 2009
Updates!
After a bunch of trial and error, I started working out how I'm going to handle her hair. I also added a rough of her head. More details have been added to her boots. I decided to put the gear/spur details on the outside ankle instead of the inside. This just looks more practical and won't get in the way as much when animating. I spent a lot of time rounding out the figure and getting rid of pesky triangles and outstanding vertices. Hopefully I will get some genius ideas on how to handle the hair by my next update. I'm going to try and get all of the symmetrical things done so I can begin adding the asymmetrical details.

Worked on the goggles some: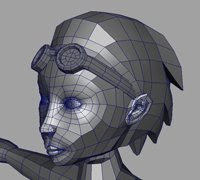

Worked on the goggles some:

Monday, June 1, 2009
Hands and Feet!
I just added some detail to the boots. The hands are now attached. I did some minor work on the torso and legs by adding some more edges to help shape things more. I'm moving on to the refining process before I tackle the head and hair. It's coming along slowly. And the smoothed model. It definitely needs more work:

 And the smoothed model. It definitely needs more work:
Saturday, May 30, 2009
The beginning...(small update)
Here's a very small update since the last. I started working out the the placement of her clothes. I had to adjust the torso some to reflect my reference more. I also started adding the base model of some of the clothes details. The model is still very blocky, but slowly progressing...


The beginning...
I started noodling away at the model. She's coming along very slowly... I'm trying to take my time so that the base model is proportioned how I want it to be. I am tinkering with how exaggerating certain aspects will affect the model.

On another note, I just visited Reno, Nevada for the first time (yesterday). The area is very cool and much different then anywhere I have been before. I got my wedding plans started and I'm very excited! I can't wait to spend more time in Reno.

On another note, I just visited Reno, Nevada for the first time (yesterday). The area is very cool and much different then anywhere I have been before. I got my wedding plans started and I'm very excited! I can't wait to spend more time in Reno.
Thursday, May 28, 2009
Character design WIP [orthographic views]
For the past couple days, I have been working on this steam punk design. I want to push my modeling skills to the limit. I eventually want to model and rig this character so that I can do some practice animation cycles with her. Who knows what the future will hold for this character. I have yet to name her or decide where she's going. This is mainly a warm-up piece that I hope to add to my portfolio.


 I have yet to name her or decide where she's going. This is mainly a warm-up piece that I hope to add to my portfolio.

The moment of reckoning has come
I finally broke down and started my first art progression blog. I am hoping this blog will get me updating my artwork on a regular basis. As an animator, I am constantly getting lost in my work and need to find alternate ways to occupy my time while also keeping my work up to date on the web. Since this is my first post, I will leave with a link to my website:
 More updates to come shortly...
More updates to come shortly...
Subscribe to:
Comments (Atom)
